How to set up iSCSI MPIO on Windows
Applies to
- ONTAP
- FlexPod
- Windows Server 2008 and above
Description
- Procedure to set up iSCSI MPIO on Windows 2008, Windows 2008 R2, Windows 2012 and Windows 2019.
- Complete[1]before starting and consider and necessary [2].
- Assumes two target portals with IP addresses on the storage per ONTAP node and host with iSCSI Software initiator with two NICs used for MPIO / load balancing / failover.
Procedure
- Add Multipath I/O as a feature in Windows 2008. Navigate to Server Manager in the Windows 2008 server, access the Features section and add the Multipath I/O feature.
- [3] for iSCSI.
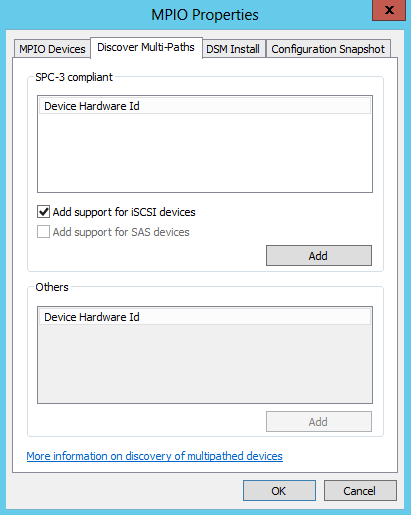
- Click Server Manager > Dashboard > Tools > MPIO, MPIO Properties dialog box, select the Discover Multi-Paths tab. Select Add support for iSCSI
- See [4]
- Configure the iSCSI Initiator on the client.
Note: You will get a prompt when you start the iSCSI Initiator for the first time, click Yes.
- Click Start>Run. Type the
iscsicplcommand to open the ISCSI software initiator configuration window.
- Click Discover Portal. Add both the IP addresses one after the other, as shown below:
- Click Advanced… and configure the information in the General tab. Make sure the Local Adapter and the Initiator IP are selected appropriately.
- Configure the MPIO. Proceed to Administrative Tools to start MPIO. Select the Add support for iSCSI devices option. Click Add to get a prompt asking you to restart the computer.
- Click Yes to Reboot the machine.
Note: The Add support for iSCSI devices option is unchecked by default. It is necessary to add a virtual disk to the iSCSI Target and then make at least one iSCSI connection before you have the option to enable MPIO for iSCSI.
After the reboot, the MSFT2005iSCSIBusType_0x9 will appear in the MPIO devices.
- Click Start>Run. Type the
iscsicplcommand to open the ISCSI software initiator configuration window. Click on the Targets tab.
You will find the target status is Inactive.
- Click Connect. Select Enable multi-path.
- Click Advanced... in the General tab.
- Select the IP address for the first path from the list in the Target portal field.
It is necessary to connect using the second path as well. Hence it is necessary to repeat Steps 9 and 10 above, this time selecting the IP address for the second path in Target portal. Again, make sure the values of the 'Local adapter' and 'Initiator IP' fields remain at 'Default'.
- Go back to the iSCSI Initiator's main window and go to the Targets tab, select the target and click Properties.
- Click Devices and click the MPIO button to configure the load balancing policy. All load balance policies are supported. Round robin with subset is generally recommended and is the default for arrays with ALUA enabled. Round robin is the default for active-active arrays that do not support ALUA and is not recommended because it will load balance with non-optimized paths.

- To view the advanced path details, click on a path and click the Details button to view the information.
Additional Information
N/A
Internal Notes
N/A